Showing posts with label DIY. Show all posts

Tuesday, February 14, 2012

Valentine's at the Bettelli's

I forgot to do a post on our Valentine's Day decorations earlier in the month, so I thought today would be perfect.
 
Here are the few festive things I did around our house to get us in the "love" mood.
 
The front doors.
$2.50 at Target . . . can't beat that!

The Kitchen Table.

Decorative Towels.


I made these cute mailboxes for each member of our family.
I got the idea from Emily at The Anderson Crew.

I bought candlesticks from the thrift store, painted them black and then gorilla glued them to the mailboxes I got in the dollar section at Target (and I stuck letter stickers to the front, obviously).


I put treats in them everyday from February 1st through Valentine's Day.


One day George asked me why no one was filling my mailbox.
I told him I didn't know.
He started putting his leftover candy in my mailbox and lifting the flag each day.
He is such a thoughtful little boy.

Lastly, I made these cute Valentine's for George to take to his class party.

They were super easy, as well.
I got the idea on the Family Fun website.
I just cut, glued, hole-punched and stuck pencils through.


I changed the saying as a tribute to one of my loves - New Kids on the Block.
Not that the four year olds in George's preschool will know who they are, but maybe when they bring them home their mothers will.
I had a good time with it, obviously.

Hope your Valentine's Day is as filled with love as mine is.

Photobucket

Wednesday, December 14, 2011

Simplicity is Key

I have talked a little about my second born, Ethan, on the blog.
 
He is a little bit of a wild man.
 
He is into everything and anything, and he likes to be entertained.
 
I am pretty much his main source of entertainment around here, especially when his brother is in school.
 
Obviously, I am always on the look out for ways to keep him busy. 
 
And I prefer things that can keep him busy for 30 seconds or longer.
 
Those things are hard to come by.
 
I saw a few ideas online the other day for sensory activities for toddlers.
 
I decided to try them out, and wouldn't you know it . . . he couldn't get enough.
 
They were so easy to put together using things I already had around the house.
 
Cheap and entertaining . . . get out of here.
 
I am sold.
 
I want to share these nuggets of wisdom with anyone out there who has a spirited toddler living in their home.
 
Here goes:
 
I used an old cool whip container (thanks to my mom who saves every single one) and a wipes container (Lord knows I have millions of those around my house).


For the cool whip container, just stab/cut five or so holes in the top . . . like so:


Then fill that puppy with those soft furry balls that you can get at any old craft store.


Now, dump out the balls and let the little one shove them back in through the holes.
Hours of entertainment I tell you.
And as if it could get any better . . . they are actually learning skills while they do it.

Disclaimer:  make sure your child is old enough to know not to put the balls in his/her mouth.

For the wipes container, I just tied a bunch of different fabrics together in little strips and filled the tub.


Again, hours of entertainment pulling the strips out and then putting them back in.
All. by. themselves.
They have such a look of accomplishment once they get it.

There you have it . . . easy ways to entertain.

Any other ideas?  Send them my way.


Photobucket

Thursday, December 8, 2011

Holiday Decor

Linking up with "Gussy."
 
Gussy Sews Inspiration Workshop!
 
Here is my favorite handmade Christmas decoration to date.


I got the idea from pinterest, where else.

It was pretty simple to make.

I just rolled up some fabric into the rosette flowers, and then added the beading from a strand I got for like 50 cents at the thrift store a while ago.

I love the rustic feel of the actual wreath mixed with the whimsical rosettes and beading.

We have double doors on our house, so I made two.

It makes me happy everytime I drive up the driveway and know I will walk through those pretty doors.
Photobucket

Thursday, December 1, 2011

Inspiration Workshop - Holiday How To

This week's prompt from Gussy is "Holiday How-To."
 
Fun and fun.
 
I can't wait to read all the tips headed my way in the link-up.  You should check it out too.
 
Anywho, here is my tip.
 
Make an advent calendar for your kids.
 
There are so many ideas out there for different ways to use the advent calendar.
 
I chose to follow the variety that include activities and special somethings to go along with the countdown to Christmas.
 
What a neat way to experience the holiday season by taking out time each day to spend quality time with your family and recognize the truth behind Christ's birth.
 
I am doing an advent calendar for the first time this year.
 
George is four years old, so I thought he would really "get" it this year.
 
Here is my plan:
 
First, I made 25 bags with numbers on them to fill with three things.


Each bag holds a Bible verse that is part of the Christmas story.

They each hold a piece of candy (leftover Halloween candy finally being used).

And lastly, each bag holds a strip of paper stating an activity we will accomplish at some point in the day.

Done and done.

The hardest part of it all was coming up with 25 activities for us to do as a family.

I had to make sure it worked with our schedule and was something that was feasible for that day.

Today is your lucky day because I am going to list the activities I am using to give you a head start on putting this together yourself.

You can thank me later.

1. Read Luke 2:1-21

2. Play your favorite game as a family

3. Go pick out a Christmas tree for our house

4. Unwrap new ornament and put it on the tree

5. Decorate a Christmas card for Nouna and Papou & Mema and Pepa

6. Walk in Largo Central Park to see the Christmas lights

7. Decorate your room for Christmas

8. Buy Ms. Joellen a Christmas gift

9. Go out and buy sibling Christmas gifts

10. Sing a Christmas song

11. Christmas program at church

12. Go out to dinner at a restaurant

13. Read all our Christmas books

14. Make a Christmas craft with mom

15. Open and wear new jammies to bed

16. Go to Disney World

17. Go to Tate’s Birthday Party

18. Open new Christmas book and read it

19. Make Christmas cookies

20. Go look at Christmas lights

21. Drink hot chocolate and eat cookies

22. Open and put together a Christmas puzzle

23. Watch Mickey Mouse Scrooge Movie

24. Read The Night Before Christmas & Pick one present under the tree to open tonight (Christmas Eve)

25. Christmas Day – Read the Christmas story

I got all my supplies at Michael's if you are interested in copying this idea (that I totally copied from an idea on pinterest).  Just sayin'


Photobucket


Thursday, November 10, 2011

Fall Wreaths

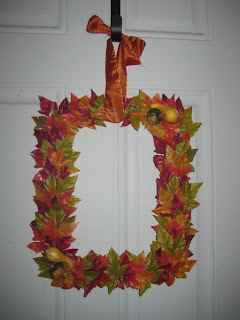
Look what I made . . .


Technically, I made them last Fall, but I didn't ever put them on the blog.

I don't have a tutorial on how to make them, but I think I can explain it pretty simply.

They were an extremely inexpensive and easy craft that can be accomplished in one naptime.  That is how I measure time . . . in how many naptimes it takes to accomplish the task.

Anyways, I bought two large rectangular picture frames from the Dollar Tree (the only dollar store where everything is actually one dollar).

I also bought one roll of the orange ribbon you see tied to the tops.

I bought four strands of Fall leaves from the Dollar Tree, as well.

I clipped all the leaves off the strands and took apart the picture frames.  I only needed the outer frame, not any of the other parts.

I (with no real technique in mind) glued each leaf to the frame until I liked the way it looked.

Then I attached the ribbon and hung it on our front door.

I love the festive spirit it envokes each time I walk through our doors.


Photobucket

Thursday, September 29, 2011

New Blog and Another Present

How do you like the new look? 
I love, love, love it!  Cindy, over at this blog designed it for me.  She did a great job and was so easy to work with.  If you ever want a new fresh look for a GREAT price, look her up.  you won't be disappointed.

It is Thursday, so I am linking up with Gussy Sews for her "Inspiration Workshop." 
Gussy Sews Inspiration Workshop!
This week the theme is "DIY."  I posted this DIY project yesterday, and today I have another one.  It is just DIY week around here:)

Here is what I got my other sister-in-law, Kim (Tim's sister), for her birthday.  I was in the crafty mood on the week of September 19th, so I made her a "Family Rules Board."


I can't take credit for this one either.  I got the idea from here (the link is to the blog, not the actual post because I can't find it anymore).  I changed up her version to make it easier and quicker.  I am all about easy and quick but still looking cute.

The rules in the Bettelli household are as follows:
1.  Obey Your Parents
2.  Keep Your Promises
3.  Encourage Your Siblings
4.  Share Everything
5.  Say Your Prayers . . . Always Thank God For This Family
6.  Use Your Manners
7.  Sing Silly, Dance Crazy
8.  Use Your Hands For Hugging, Not Hitting
9.  Always Say, "I Love You."

I made one for our house, and Kim really liked it.  She asked for one for her birthday, so I obliged.  They are pretty easy to make.  If you want to make one and have questions, you can ask in the comments.  I promise I will answer.


Image and video hosting by TinyPic

Wednesday, September 28, 2011

Birthday Present - DIY

Here is what I made my sister-in-law (Whitney) for her birthday. 
I can't take credit because I followed the tutorial here.
It came out really cute.  I think I might make these for George's preschool teachers as a Christmas present.  It was pretty cost effective too, so that always helps.

Image and video hosting by TinyPic

Tuesday, September 6, 2011

Birthday Wreath Tutorial

I have one more tutorial from Ethan's birthday party. I made a wreath out of balloons that were not blown up. I originally saw the idea on Pinterest, so I copied it:) I think it turned out pretty cute.


It was very simple to put together. I just bought around 300 balloons - 7 or 8 multi-packs from the Dollar Tree, and greening pins from Michael's. I had a wreath from a thrift store that I never used. You can get them from any craft store. I used the kind that looks like it is made out of straw but has a plastic wrap on the outside. Leave the plastic wrap on for this project.


All you do is put a balloon in the greening pin and stick the pin to the wreath. I just placed them randomly all over the front side of the wreath, and it seemed to work pretty well.

I also decoupaged a wooden number 1 with Elmo wrapping paper, and then attached it to the wreath with red ribbon. I was happy with the result. We hung it on the front door for the party. I also like the idea that I will be able to use the wreath for all our birthday parties from here on out. (I will change out the number, of course.)

Again, I hope these pictures helped you to understand the process. This is a fun project that will get a lot of use in our household.

Tuesday, August 30, 2011

Sesame Street Pom-poms: My first tutorial

Starting the blog was something new for me, and today I am going to venture out even more. I am going to post my very first tutorial. One of the things I think I am pretty good at is copying. I can usually see something and figure out how to put it together.

Case in point - these Sesame Street Pom-poms.
I saw a picture of these on Pinterest, but there was no tutorial. They were connected to an etsy website, so someone was selling them. I googled how to make the pom-poms, and then I went to work.
First step is to lay out four sheets of tissue paper. (I bought a multi-colored pack at the dollar store, so each pom cost me 25 cents). You need to make sure they are lined up exactly.

Then I cut the paper in half horizontally.

Put one half on top of the other half. Then begin folding like a fan - back and forth.

At this point if you are making pretty pom-poms you can cut the ends into half circles. Since I was making monsters I cut the ends into points or triangles.

Next, you need to tie the middle of the tissue paper with floral wire. You can find it at craft stores for pretty cheap. I cut a short amount and tied it around the middle.


Then you need to separate each side of the fan. Fan it out as so:
Lastly, you will separate each sheet of tissue from the others. This takes a little patience because the tissue can rip easily. Just separate one by one until your pom puffs out into a pretty little pom-pom.

For the faces I just used construction paper and mod podge to attach it. It was pretty easy to duplicate, and you could really do any character or theme. It was a big hit at the birthday party.
 

Let me know if this was understandable. Like I said, this is my first attempt. I was trying to take pictures that would explain each step. I hope someone could put these together from my directions.

Party on!